Implementation
Sequence Diagram

Card Data Parameters
Start the push provisioning flow by initializing an MppCardDataParameters object with CardId, CardSecret, or EncryptedPan.
For guidance on generating encryptedCardData, see the Card Data Encryption manual.
let cardId = "<value>"
let cardSecret = "<value>"

let cardParams = MppCardDataParameters.init(cardId: cardId, cardSecret: cardSecret)
or
let encryptedCardData = "<value>"
let publicKeyFingerprint = "<value>"
let encryptedKey = "<value>"
let initialVector = "<value>"

let cardParams = MppCardDataParameters.init(encryptedCardData: encryptedCardData,
                                            publicKeyFingerprint: publicKeyFingerprint,
                                            encryptedKey: encryptedKey,
                                            initialVector: initialVector)
Loading Configuration
The MPP SDK loads the mea_config configuration file by default, but you can specify a custom filename. When using a custom configuration file name, call MeaPushProvisioning.loadConfig(configFileName: String) to load it. Place the configuration file anywhere in your application bundle.
import MeaPushProvisioning

...

func application(_ application: UIApplication, didFinishLaunchingWithOptions launchOptions: [UIApplication.LaunchOptionsKey: Any]?) -> Bool {

    MeaPushProvisioning.loadConfig("custom_config_name")

    ...

    return true
}
INFOThe MPP SDK throws an exception if the configuration file is missing, corrupted, or fails to load.
❗ Make sure you've added mea_config (or your custom-named file) to the correct target:
Initialize Apple Pay In-App Provisioning
The MPP SDK provides the MeaPushProvisioning class with an initializeOemTokenization method to start Apple Pay In-App provisioning.
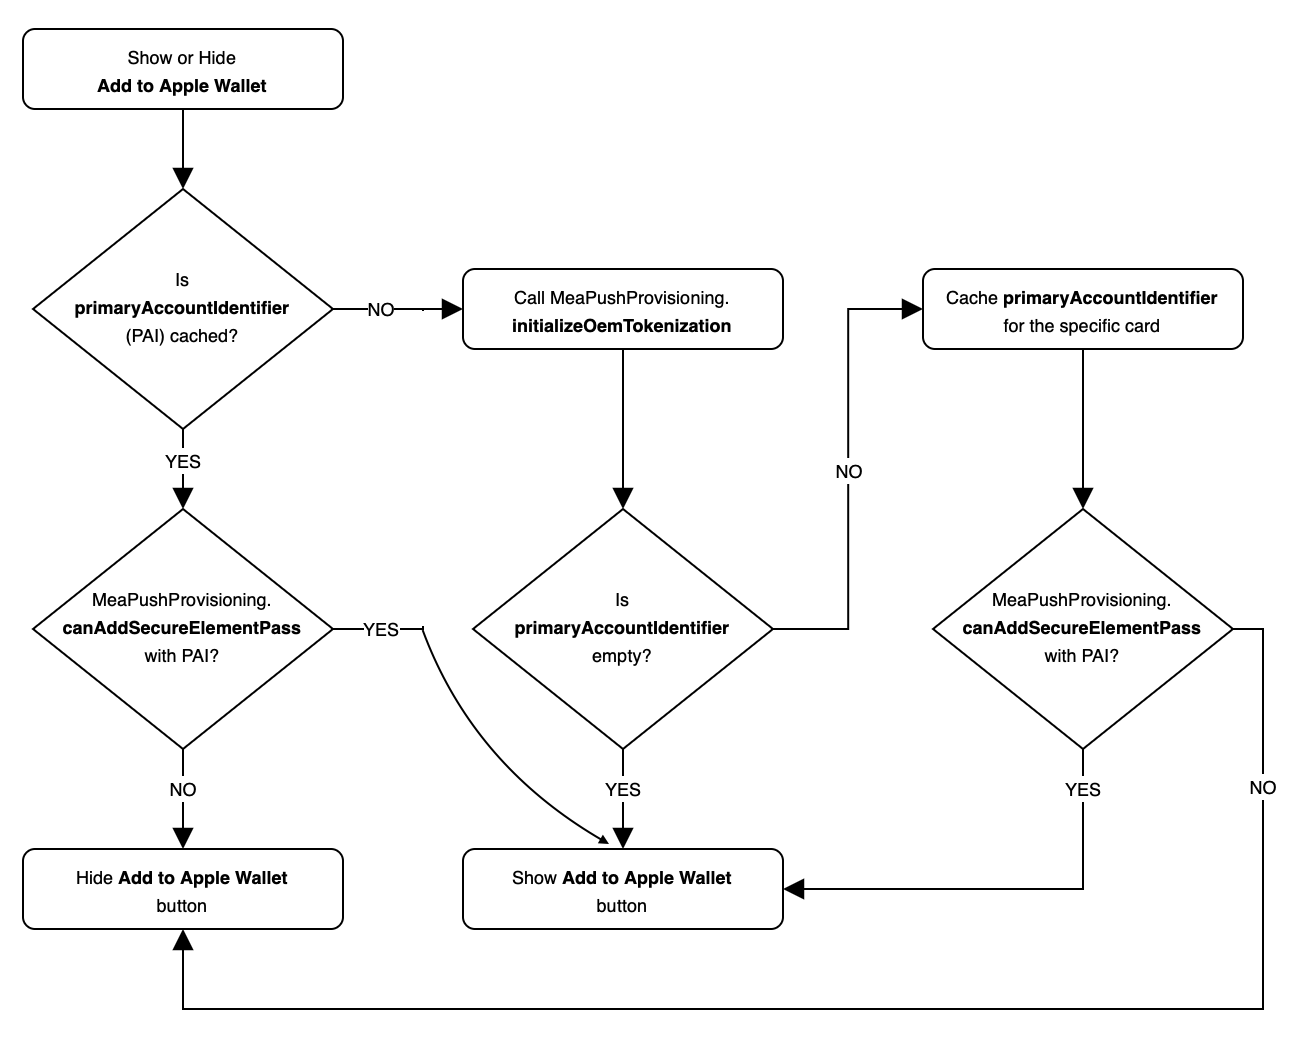
Start in-app push provisioning using MeaPushProvisioning.initializeOemTokenization with your MppCardDataParameters. Check whether the payment card can be added to Apple Pay by examining the primaryAccountIdentifier in the response. See Show or hide "Add to Apple Wallet" button.
The tokenization receipt in MppInitializeOemTokenizationResponseData has a validity period determined by tokenizationResponseData.validFor (in milliseconds). During this validity window (15 minutes by default), you can use the tokenization receipt with MeaPushProvisioning.completeOemTokenization(tokenizationData). Once the receipt expires, you'll need to initialize again.
INFOprimaryAccountIdentifier
- This value is always empty for the first push provisioning of a specific card. An empty value means the card can be added to Apple Pay.
- Users may have different passes on different paired devices (iPhone and Apple Watch). This property lets you filter out devices that already have a matching pass.
- Once you get this value for a specific card, cache the primaryAccountIdentifier to avoid unnecessary
MeaPushProvisioning.initializeOemTokenizationcalls when showing or hiding the Add to Apple Wallet button.
let isPassLibraryAvailable = PKPassLibrary.isPassLibraryAvailable()
let canAddPaymentPass = PKAddPaymentPassViewController.canAddPaymentPass()

if (isPassLibraryAvailable && canAddPaymentPass) {
    MeaPushProvisioning.initializeOemTokenization(mppCardParameters) { (responseData, error) in
        if (responseData?.isValid())! {
            // Field primaryAccountIdentifier is always empty for the very first tokenization of the card.
            var canAddPaymentPassWithPAI = true
            if let primaryAccountIdentifier = responseData?.primaryAccountIdentifier, !primaryAccountIdentifier.isEmpty {
                if #available(iOS 13.4, *) {
                    canAddPaymentPassWithPAI = MeaPushProvisioning.canAddSecureElementPass(primaryAccountIdentifier: primaryAccountIdentifier)
                } else {
                    canAddPaymentPassWithPAI = MeaPushProvisioning.canAddPaymentPass(withPrimaryAccountIdentifier: primaryAccountIdentifier)
                }
            }

            if (canAddPaymentPassWithPAI) {
                self.tokenizationResponseData = responseData;

                // Show "Add to Apple Wallet" button.
                // ...
            }
        }
    }
}
Add to Apple Wallet Button
Create an Add to Apple Wallet button using the PKAddPassButton class. The iOS SDK provides the correct appearance.
let addPassButton = PKAddPassButton(addPassButtonStyle: PKAddPassButtonStyle.black)
addPassButton.frame = CGRect(x:45.0, y: 340.0, width: 320, height: 20)
view.addSubview(addPassButton)
Show or Hide Add to Apple Wallet Button
INFOassociatedApplicationIdentifiersProperly configuring
associatedApplicationIdentifiersallows your app to see, access, and activate payment passes. The methods[[PKPassLibrary new] passes],[[PKPassLibrary new] remotePaymentPasses]/[[PKPassLibrary new] remoteSecureElementPasses]and[passLibrary canAddPaymentPassWithPrimaryAccountIdentifier:]/[passLibrary canAddSecureElementPassWithPrimaryAccountIdentifier:]will ONLY return passes if yourApp ID(TeamID.BundleID) is listed inassociatedApplicationIdentifierson the token service provider side.Construct your
App IDby combining your Team ID with your App bundle ID, for example:A1B2C3D4E5.com.thebank.mobileapp.
TeamIDis your Apple Developer team used to distribute your app through the App Store.BundleIDis your app's identifier.
Your app determines whether to show or hide the "Add to Apple Wallet" button using primaryAccountIdentifier or primaryAccountNumberSuffix. Use primaryAccountNumberSuffix when the Customer Service API backend isn't available. Only show the button when the card hasn't been added to Apple Pay yet. Choose one of the following approaches.
Check whether a card with a specific primaryAccountNumberSuffix can be added to Apple Wallet:
MeaPushProvisioning.canAddPaymentPass(withPrimaryAccountNumberSuffix:)(before iOS 13.4)MeaPushProvisioning.canAddSecureElementPass(withPrimaryAccountNumberSuffix:)(iOS 13.4+)
Check whether a card with a specific primaryAccountIdentifier can be added to Apple Wallet:
MeaPushProvisioning.canAddPaymentPass(withPrimaryAccountIdentifier:)(before iOS 13.4)MeaPushProvisioning.canAddSecureElementPass(withPrimaryAccountIdentifier:)(iOS 13.4+)
The return value indicates whether your app can add a card to Apple Pay for the given primary account identifier. This doesn't provide device-specific information about Apple Wallet on iPhone or Apple Watch.
Caching PrimaryAccountIdentifier
Cache the primaryAccountIdentifier value for each card to avoid unnecessary MeaPushProvisioning.initializeOemTokenization calls when showing or hiding the Add to Apple Wallet button. You can cache this value permanently.
Check if Card Can Be Added to Apple Wallet on iPhone or Apple Watch
INFOOnly continue reading if your app needs to detect whether
PKPaymentPassorPKSecureElementPasscan be added specifically to Apple Wallet on iPhone or Apple Watch. For Apple Watch, only use when paired with iPhone.
- Use one of the methods above to check whether the card can be added to Apple Wallet on iPhone or Apple Watch. The return value indicates if the card can be added, but doesn't specify which device.
- Detect if Apple Watch is paired with iPhone.
import WatchConnectivity

...

if WCSession.isSupported() { // Check if the iPhone supports Watch Connectivity session handling.
    let session = WCSession.default()
    session.delegate = self
    session.activate() // Activate the session, asynchronous call to delegate method below.
}

...

func session(_ session: WCSession, activationDidCompleteWith activationState: WCSessionActivationState, error: Error?) {
    if activationState == .activated && session.isPaired {
        // Apple Watch is paired with iPhone.
    }
}- Check if
PKPaymentPassorPKSecureElementPassalready exists in Apple Wallet on iPhone or Apple Watch:
- Apple Wallet on iPhone:
// Before iOS 13.4
let cardExists = MeaPushProvisioning.paymentPassExists(withPrimaryAccountIdentifier: "<primaryAccountIdentifier>")
let cardExists = MeaPushProvisioning.paymentPassExists(withPrimaryAccountNumberSuffix: "4321")

// iOS 13.4+
let cardExists = MeaPushProvisioning.secureElementPassExists(withPrimaryAccountIdentifier: "<primaryAccountIdentifier>")
let cardExists = MeaPushProvisioning.secureElementPassExists(withPrimaryAccountNumberSuffix: "4321")- Apple Watch:
// Before iOS 13.4
let cardExists = MeaPushProvisioning.remotePaymentPassExists(withPrimaryAccountIdentifier: "<primaryAccountIdentifier>")
let cardExists = MeaPushProvisioning.remotePaymentPassExists(withPrimaryAccountNumberSuffix: "4321")

// iOS 13.4+
let cardExists = MeaPushProvisioning.remoteSecureElementPassExists(withPrimaryAccountIdentifier: "<primaryAccountIdentifier>")
let cardExists = MeaPushProvisioning.remoteSecureElementPassExists(withPrimaryAccountNumberSuffix: "4321")Add Payment Pass View Controller
Your mobile app must create a PKAddPaymentPassViewController instance to prompt users to add a pass to their pass library.
Initialize PKAddPaymentPassViewController using data from the initializeOemTokenization:completionHandler: handler and a delegate that implements the PKAddPaymentPassViewControllerDelegate protocol.
let addPaymentPassRequestConfiguration = self.tokenizationResponseData?.addPaymentPassRequestConfiguration
addPaymentPassRequestConfiguration?.cardholderName = "Cardholder Name"

let paymentPassController =
    PKAddPaymentPassViewController.init(requestConfiguration: addPaymentPassRequestConfiguration!, delegate: self)

self.present(paymentPassController!, animated: true, completion: nil)
Complete Apple Pay In-App Provisioning
To complete provisioning, use the MeaPushProvisioning class's completeOemTokenization method. This method exchanges Apple certificates and signature with the Issuer Host.
Your delegate should implement the PKAddPaymentPassViewControllerDelegate protocol to call completeOemTokenization:completionHandler:. After the data exchange, PKAddPaymentPassRequest gets passed to the handler to add the payment card to Apple Wallet. A delegate method then tells you whether the request succeeded or failed.
func addPaymentPassViewController(_ controller: PKAddPaymentPassViewController,
                                generateRequestWithCertificateChain certificates: [Data],
                                nonce: Data, nonceSignature: Data,
                                completionHandler handler: @escaping (PKAddPaymentPassRequest) -> Void) {

        let tokenizationData =
            MppCompleteOemTokenizationData(tokenizationReceipt: self.tokenizationResponseData.tokenizationReceipt,
                                            certificates: certificates,
                                            nonce: nonce,
                                            nonceSignature: nonceSignature)

        MeaPushProvisioning.completeOemTokenization(tokenizationData){ (responseData, error) in

            if  (responseData?.isValid())! {
                handler((responseData?.addPaymentPassRequest)!)
            }
        }
    }

func addPaymentPassViewController(_ controller: PKAddPaymentPassViewController,
                                didFinishAdding pass: PKPaymentPass?,
                                error: Error?) {

    self.presentedViewController?.dismiss(animated: true, completion: nil)
}
In-App Verification
Apple Pay In-App Verification lets credit or debit card issuers use their iOS mobile app to verify users and activate payment passes previously provisioned through Apple Wallet.
Users find In-App Verification convenient for activating recently provisioned payment passes alongside existing SMS/email OTP and call center ID&V methods.
In-App Verification Sequence Diagram

Adding In-App Verification
Your issuer app needs to implement the following for app-to-app verification:
1. Start the activation process
Prompt users immediately after login to activate any passes awaiting activation. Alternatively, trigger a different experience if the user arrives via deep link from Apple Wallet activation using 'appLaunchURL'.
INFO
"appLaunchURL":["scheme://path"]
This key gets passed to your issuer app when users tap your app icon on the back of the pass in Apple Wallet or when your app opens during In-App Verification.
Defining a custom URL scheme for your app.
2. Authenticate the cardholder
Use your standard issuer app authentication to verify the user.
3. Get activation code
Your app should check if the activation state of a Secure Element Pass is set to requiresActivation.
Use MeaPushProvisioning.getActivationData(...) to get the activation code:
MeaPushProvisioning.getActivationData(cardParams) { (data, error) in
    if let activationData = data {
        // Activation data received, proceed to the Pass activation
    } else {
        // Handle error.
    }
}
4. Complete activation
Activate the secureElementPass using the activation data from the previous step:
MeaPushProvisioning.activate(secureElementPass, withActivationData: activationData) { (activated, error) in
    if (activated) {
        // Pass activated successfully.
    } else {
        // Handle error.
    }
}
Handle Apple Wallet Change Notifications
PassKit posts PKPassLibraryDidChangeNotification when a pass is added or removed on iPhone, and PKPassLibraryRemotePaymentPassesDidChangeNotification when a pass is added or removed on a paired Watch.
Listen for these notifications to refresh the Add to Apple Wallet button state. These notifications are received and handled when your app is in the foreground.
Start listening for change notifications.
let notificationCenter = NotificationCenter.default
notificationCenter.addObserver(self, selector: #selector(self.handleChangeNotification(notification:)), name: NSNotification.Name.PKPassLibraryDidChange, object: nil)
notificationCenter.addObserver(self, selector: #selector(self.handleChangeNotification(notification:)), name: NSNotification.Name.PKPassLibraryRemotePaymentPassesDidChange, object: nil)

...

@objc func handleChangeNotification(notification: Notification) {
    // The notification's user info dictionary describes the changes.
    // Refresh the state of the Add to Apple Wallet button here.
}
Stop listening for change notifications.
NotificationCenter.default.removeObserver(self, name: NSNotification.Name.PKPassLibraryDidChange, object: nil)
NotificationCenter.default.removeObserver(self, name: NSNotification.Name.PKPassLibraryRemotePaymentPassesDidChangeNotification, object: nil)
Wallet Extensions
INFOWallet Extensions (In-App Provisioning Extensions) support is mandatory.
References
- See the "Wallet Extensions" section in "Getting Started with Apple Pay In-App Provisioning, Verification, and Security v4" guide that Apple shares with Issuers when signing the Apple Pay contract.
- Watch Apple WWDC 2020 - Adding Cards to Apple Pay to learn about Apple's In-App Provisioning Extensions introduction.
- Read Creating an App Extension to learn about App Extensions.
Overview
Wallet Extensions (In-App Provisioning or Issuer Extensions) help users discover they can add payment passes to Apple Pay by improving visibility right within Apple Wallet.
This gives users the in-app experience of adding a payment pass, but starts directly inside Apple Wallet. The entire process happens within Apple Wallet, providing a convenient way for users to provision payment passes. Apple introduced Wallet Extensions in iOS 14. Your issuer app needs to provide special App Extensions to Apple Wallet to request and provision available cards.
INFO
- Your issuer app must be installed and opened at least once so Apple Wallet knows payment passes are available. Apple Wallet can also prompt for user authentication when adding payment passes.
- Wallet Extensions require the same entitlement used for In-App Provisioning:
com.apple.developer.payment-pass-provisioning.- For Wallet to hide passes users have already added to their device, include your extension's bundle identifier in
associatedApplicationIdentifierson the token service provider side.
Issuer Provisioning Extensions Sequence Diagram

Adding Wallet Extensions
Wallet Extensions are app extension-based and let your issuer app extend custom functionality and content to Apple Wallet. Apple Wallet triggers all methods, and your app extension's behavior depends entirely on completion handlers and return values. This feature needs two extensions:
- Your issuer app should provide a non-UI extension (subclass of
PKIssuerProvisioningExtensionHandler) to report extension status and available payment passes for provisioning (similar to adding payment passes from within your issuer app). - Your issuer app should provide a UI extension (UIViewController conforming to
PKIssuerProvisioningExtensionAuthorizationProviding) to authenticate users if the non-UI extension reports that authentication is required. The UI extension is a separate screen using the same issuer app login credentials—it's not a redirect to your issuer app.
❗❗❗ Wallet Extensions don't use a specific extension type template.
Create any extension (like
Intents Extension) and remove all unnecessary auto-generated files. Keep onlyInfo.plistand theHandlerclass file.
1. Creating App Extensions
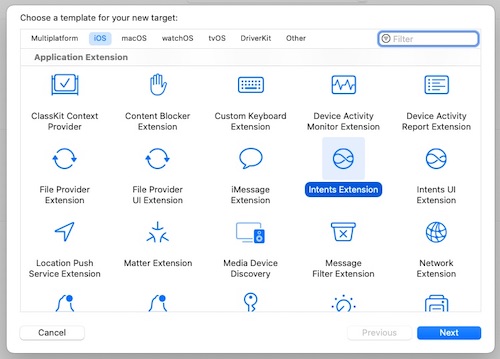
Use Intents Extension as the base. Create two app extensions called IssuerNonUIExtension and IssuerUIExtension:
- Add an app extension to your Xcode project: choose
File > New > Target, then selectiOS > Application Extension > Intents Extension.
- Set options for the new target. Create a unique bundle ID for the extension and add App IDs to
associatedApplicationIdentifiersin PNO metadata.
For example:
A1B2C3D4E5.com.bank.app
A1B2C3D4E5.com.bank.app.IssuerNonUIExtension
A1B2C3D4E5.com.bank.app.IssuerUIExtension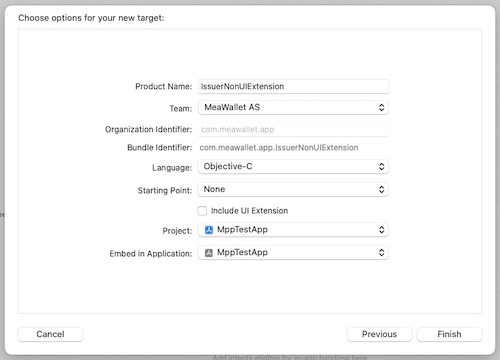
- Activate the created scheme if prompted.
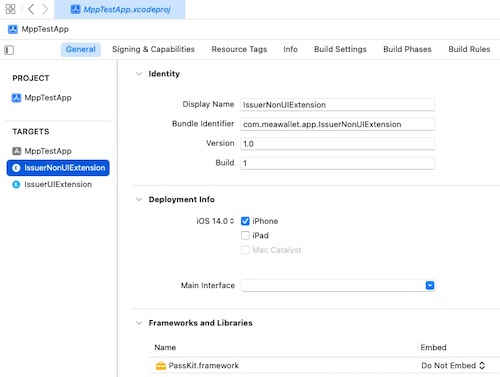
- Add
PassKit.frameworktoFrameworks and Librariesfor bothIssuerNonUIExtensionandIssuerUIExtensiontargets, and remove the unnecessaryIntents.framework. - Remove
Intents.frameworkfrom theIssuerUIExtensiontarget.
2. App Extensions Configuration
- Register both app
extension bundle identifiersin the Apple Developer portal Identifiers section. Create correspondingprovisioning profiles. - Create a new App Group and add the main app and both app extension bundle identifiers so data can be shared between them.
- Add
mea_configtoIssuerNonUIExtensionwhich uses the MPP SDK. Since app extensions run separately from the main app process, the SDK initializes separately.
3. Implementing Issuer Authorization Provider Extension
- The
IssuerAuthorizationExtensionHandlerUI extension should conform toPKIssuerProvisioningExtensionAuthorizationProviding. Apple Wallet queries your issuer app to determine user authorization status, and the authorization UI extension handles user authentication. - App UI extensions have a 60 MB memory limit—you're responsible for optimizing code and libraries to meet this requirement.
IssuerAuthorizationExtensionHandler.swift
import PassKit
import UIKit

@available(iOS 14.0, *)
class IssuerAuthorizationExtensionHandler: UIViewController, PKIssuerProvisioningExtensionAuthorizationProviding {
    var completionHandler: ((PKIssuerProvisioningExtensionAuthorizationResult) -> Void)?

    override func viewDidLoad() {
        super.viewDidLoad()
        // Set up view and authenticate user.
    }

    func authenticateUser() {
        let userAuthenticated = true // User authentication outcome.

        let authorizationResult: PKIssuerProvisioningExtensionAuthorizationResult = userAuthenticated ? .authorized : .canceled

        self.completionHandler?(authorizationResult)
    }
}
4. Implementing Issuer Extension Handler
- The
IssuerExtensionHandlernon-UI class must subclassPKIssuerProvisioningExtensionHandler. Your issuer app must be installed and opened at least once for the system to call the issuer extension handler. - App Non-UI extensions have a 55 MB memory limit—you're responsible for optimizing code and libraries to meet this requirement.
❗❗❗ The system creates a new
PKIssuerProvisioningExtensionHandlerinstance for every method callYou cannot share data between method calls via private class properties!
Use other approaches like global variables outside the class.
IssuerExtensionHandler.swift
import PassKit
import MeaPushProvisioning
@available(iOS 14.0, *)
class IssuerExtensionHandler: PKIssuerProvisioningExtensionHandler {
func status(completion: @escaping (PKIssuerProvisioningExtensionStatus) -> Void) {
// Determines if there is a pass available and if adding the pass requires authentication.
// The completion handler takes a parameter status of type PKIssuerProvisioningExtensionStatus that indicates
// whether there are any payment cards available to add as Wallet passes.
// PKIssuerProvisioningExtensionStatus has the following properties:
// requiresAuthentication: Bool - authorization required before passes can be added.
// passEntriesAvailable: Bool - passes will be available to add (at least one).
// remotePassEntriesAvailable: Bool - passes will be available to add on the remote device (at least one).
// The handler should be invoked within 100ms. The extension is not displayed to the user in Wallet if this criteria is not met.
}
func passEntries(completion: @escaping ([PKIssuerProvisioningExtensionPassEntry]) -> Void) {
// Finds the list of passes available to add to an iPhone.
// The completion handler takes a parameter entries of type Array<PKIssuerProvisioningExtensionPassEntry> representing
// the passes that are available to add to Wallet.
// Call MeaPushProvisioning.initializeOemTokenization(cardParams, completionHandler: { (data: MppInitializeOemTokenizationResponseData, error: Error?) in ... }) and initialize PKIssuerProvisioningExtensionPaymentPassEntry for each card that can be added to Wallet and add to the array.
// Use addPaymentPassRequestConfiguration of MppInitializeOemTokenizationResponseData object to set addRequestConfiguration.
// PKIssuerProvisioningExtensionPaymentPassEntry has the following properties:
// art: CGImage - image representing the card displayed to the user. The image must have square corners and should not include personally identifiable information like user name or account number.
// title: String - a name for the pass that the system displays to the user when they add or select the card.
// identifier: String - an internal value the issuer uses to identify the card. This identifier must be stable.
// addRequestConfiguration: PKAddPaymentPassRequestConfiguration - the configuration data used for setting up and displaying a view controller that lets the user add a payment pass.
// Do not return payment passes that are already present in the user's pass library.
// The handler should be invoked within 20 seconds or will be treated as a failure and the attempt halted.
}
func remotePassEntries(completion: @escaping ([PKIssuerProvisioningExtensionPassEntry]) -> Void) {
// Finds the list of passes available to add to an Apple Watch.
// The completion handler takes a parameter entries of type Array<PKIssuerProvisioningExtensionPassEntry> representing
// the passes that are available to add to Apple Watch.
// Call MeaPushProvisioning.initializeOemTokenization(cardParams, completionHandler: { (data: MppInitializeOemTokenizationResponseData, error: Error?) in ... }) and initialize PKIssuerProvisioningExtensionPaymentPassEntry for each card that can be added to Wallet and add to the array.
// Use addPaymentPassRequestConfiguration of MppInitializeOemTokenizationResponseData object to set addRequestConfiguration.
// PKIssuerProvisioningExtensionPaymentPassEntry has the following properties:
// art: CGImage - image representing the card displayed to the user. The image must have square corners and should not include personally identifiable information like user name or account number.
// title: String - a name for the pass that the system displays to the user when they add or select the card.
// identifier: String - an internal value the issuer uses to identify the card. This identifier must be stable.
// addRequestConfiguration: PKAddPaymentPassRequestConfiguration - the configuration data used for setting up and displaying a view controller that lets the user add a payment pass.
// Do not return payment passes that are already present in the user's pass library.
// The handler should be invoked within 20 seconds or will be treated as a failure and the attempt halted.
}
func generateAddPaymentPassRequestForPassEntryWithIdentifier(
_ identifier: String,
configuration: PKAddPaymentPassRequestConfiguration,
certificateChain certificates: [Data],
nonce: Data,
nonceSignature: Data,
completionHandler completion: @escaping (PKAddPaymentPassRequest?) -> Void) {
// Creates an object with the data the system needs to add a card to Apple Pay.
// identifier: String - an internal value the issuer uses to identify the card.
// configuration: PKAddPaymentPassRequestConfiguration - the configuration the system uses to add a secure pass. This configuration is prepared in methods passEntriesWithCompletion: and remotePassEntriesWithCompletion:.
// certificates, nonce, nonceSignature - parameters are generated by Apple Pay identically to PKAddPaymentPassViewControllerDelegate methods.
// The completion handler is called by the system for the data needed to add a card to Apple Pay.
// This handler takes a parameter request of type PKAddPaymentPassRequestConfiguration that contains the card data the system needs to add a card to Apple Pay.
// Call MeaPushProvisioning.completeOemTokenization(tokenizationData, completionHandler: { (data: MppCompleteOemTokenizationResponseData, error: Error?) in ... }), and
// use addPaymentPassRequest of MppCompleteOemTokenizationResponseData to set request in completion handler.
// The continuation handler must be called within 20 seconds or an error is displayed.
// Subsequent to timeout, the continuation handler is invalid and invocations are ignored.
}
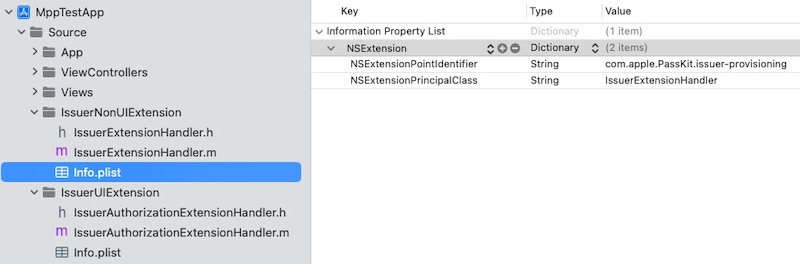
}5. Updating Extension's Info.plist
- Modify the
NSExtensiondictionary in your extension'sInfo.plistand delete theNSExtensionAttributesentry.
Specify NSExtensionPointIdentifier and NSExtensionPrincipalClass in your extension's Info.plist properties dictionary:
Non-UI App Extension
Values:
| Key | Type | Value |
|---|---|---|
| NSExtensionPointIdentifier | String | com.apple.PassKit.issuer-provisioning |
| NSExtensionPrincipalClass | String | $(PRODUCT_MODULE_NAME).IssuerExtensionHandler |
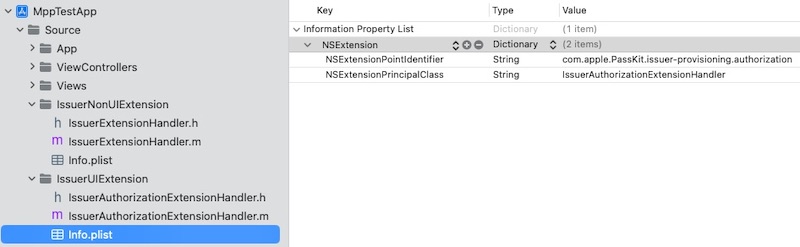
UI App Extension
Values:
| Key | Type | Value |
|---|---|---|
| NSExtensionPointIdentifier | String | com.apple.PassKit.issuer-provisioning.authorization |
| NSExtensionPrincipalClass | String | $(PRODUCT_MODULE_NAME).IssuerAuthorizationExtensionHandler |
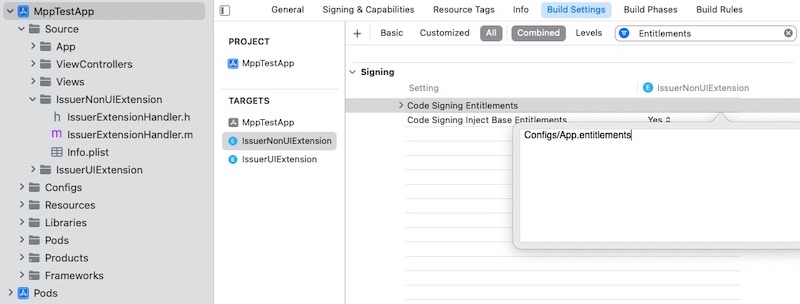
6. Setting Code Signing Entitlements
- Issuer Extensions use the same entitlement file as your issuer app's In-App Provisioning.
Debugging
Use setDebugLoggingEnabled to enable/disable console logging. Use versionName and versionCode to check the SDK version when needed.
import MeaPushProvisioning

...

func application(_ application: UIApplication, didFinishLaunchingWithOptions launchOptions: [UIApplication.LaunchOptionsKey: Any]?) -> Bool {

    MeaPushProvisioning.setDebugLoggingEnabled(true)

    print(String(format: "SDK version: %@, code: %@", MeaPushProvisioning.versionName(), MeaPushProvisioning.versionCode()))

    ...

    return true
}
Testing in Sandbox Mode
The Apple Pay In-App Provisioning entitlement com.apple.developer.payment-pass-provisioning only works with distribution provisioning profiles. Even after obtaining it, you can only test the complete push provisioning flow by distributing your app through TestFlight or the App Store first.
Apple Pay Sandbox Testing: Sandbox Testing