PCI Widget Mobile
In addition to the PCI widget for web, we offer a mobile version with the same core functionality.

Implementation Guide
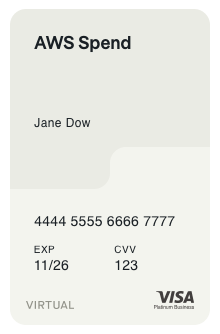
The PCI widget integrates into your mobile application via an iframe + WebView combination, displaying card data for approximately 45 seconds. After this period, the card details are automatically hidden for security purposes.
You'll need two parameters for implementation:
traceId: A random UUIDv4 that you generate when making the request. This ID helps trace the request through all related systems and must remain consistent throughout the PCI widget request. Use the same ID in both the iFrame URL and the OTP request (see endpoint).widgetConfig: The configuration object for the widget, containing elements like thecardId(the Pliant identifier for the specific card) and design parameters. Full configuration details are available in the widget config section.
Base Information
For core functionality details, refer to the following sections:
Styling via CSS File
CSS File Creation and Testing
To customize the widget appearance:
- Create a new
<file_name>.cssfile - Create a companion
test.htmlfile with content copied from the iframe HTML structure - Use these files to experiment with CSS and achieve your desired presentation
The static CSS file (<link crossorigin="" href="./widget/static/pci-widget.css" rel="stylesheet" type="text/css">) is available at https://pci-api.getpliant.com/card-details/widget/static/pci-widget.css.
Example CSS File Content:
@font-face {
    font-family: 'MaisonNeue';
    src: url('https://example.com/fonts/MaisonNeue-Book.woff2') format('woff2');
    font-weight: 400;
    font-style: normal;
  }

  html,
  body {
    height: 100vh;
    width: 100vw;
    background-color: transparent;
  }

  .wrapper {
    width: 100vw;
    height: 100vh;
    background: transparent;
  }

  .pliant-pci-widget {
    width: 100vw;
    height: 100vh;
    padding: 0px;
    margin: 0px;
    padding-left: 12vw;
    background: transparent;
  }
  .pliant-pci-widget-container {
    row-gap: 0;
  }

  .pliant-expiry-cvv-result {
    margin-top: 3.797vh;
  }

  .pliant-cvv-result,
  .pliant-expiry-result {
    width: 50%;
  }

  .pliant-cardholder-result {
    display: none;
  }

  .pliant-copy-btn {
    display: none;
  }

  /**
  * Card number: mono font is default for it
  */
  .mono {
    font-family: 'MaisonNeue', sans-serif;
  }

  .pliant-field-value {
    font: 400 5vh/5vh 'MaisonNeue', sans-serif;
    letter-spacing: 0.25px;
  }

  .pliant-field-name {
    font: 400 3.79vh/3.8vh 'MaisonNeue', sans-serif;
    letter-spacing: 0.5px;
  }

  /**
  * Physical Card
  */

  .physical-card .pliant-pan-result {
    margin-top: 50.949vh;
  }

  .physical-card .pliant-field-value {
    color: rgba(255, 255, 255, 1);
  }

  .physical-card .pliant-field-name {
    color: rgba(255, 255, 255, 1);
  }

  /**
  * Virtual Card
  */

  .virtual-card .pliant-pan-result {
    margin-top: 63.924vh;
  }

  .virtual-card .pliant-field-value {
    color: rgba(0, 0, 0, 0.87);
  }

  .virtual-card .pliant-field-name {
    color: rgba(0, 0, 0, 0.87);
  }
Note the .physical-card and .virtual-card CSS classes. These can be specified as the cssClass value in the Widget Config, allowing for more refined customization based on card type. For example:
.physical-card .pliant-field-value {color: #AAAAAA}.virtual-card .pliant-field-value {color: #BBBBBB}
By passing cssClass=virtual-card in your configuration, the second CSS block will be applied to your widget.
Hosting Your CSS File
Host your customized CSS file at a publicly accessible URL, then reference this URL in the styleUrl parameter of your Widget Config when setting up the iframe.
Getting an OTP for the PCI Widget
For details on obtaining the one-time password needed for widget initialization, see the OTP documentation.
Platform-Specific Implementation
For platform-specific integration guides, refer to:
Updated 5 months ago
